Edit OpenStreetMap
OpenSchoolMaps.ch — Free Learning Materials on Free Geodata and Maps
A worksheet for instructors and teachers
| With this worksheet and the "walkthrough" (a software-guided introductory course) built into the online OpenStreetMap "iD" editor, you will learn how to edit OpenStreetMap data with this editor. This way you can improve and complete the map yourself. |
On OpenStreetMap you can not only view the world map, but also edit it. To add or change data, you first need a user account.
Overview
After editing the corresponding worksheet, students should be able to add or modify data, such as a bench, a well or a waste bin, on openstreetmap.org using the iD editor.
Students in Lehrplan 21 Zyklus 2 or 3 (4th to 9th school year)
-
Registration: 5 minutes
-
Walkthrough for the editor: 20-30 minutes
-
Enter data on OpenStreetMap yourself: 20-30 minutes
The total time taken should be about one lesson (45 minutes).
Preparation
For this task the students need an OSM account.
Create and login user account
To create an account, press the "Register" button at the top right. You must enter your email address and choose a username and password. If you already have an OpenStreetMap user account, you can of course click on "Login" instead.
After you have completed the registration, OpenStreetMap sends you an email and the address you entered to check if you can really be reached via this email address. In this message you will find a confirmation link that you will need to visit to complete the registration process.
| Alternatively, you can log in with a Google, Facebook or Microsoft account. The worksheet "Mapping the environment yourself - Outdoor Mapping Event" contains tips on how to create accounts for pupils (participants). |
Change language (if necessary)
If the buttons on OSM.org are not displayed in English after logging in, you can change this as follows:
-
Click on the button with your user name in the upper right corner.
-
Select "Settings" from the dropdown menu.
-
Under the setting "Preferred Languages" replace the text with
en-UK en. -
Click the "Save Changes" button at the bottom to save this change.
The editor used below will use the same language if available.
iD, the web editor of OpenStreetMap
There are several editors that can be used to edit OpenStreetMap. We will use the editor called "iD", which is already built into the OSM.org website.
Walkthrough
To get to know this editor, you should first work through its built-in "walkthrough". To do this, press the "Edit"-button in the upper left corner. If a welcome message is then displayed, click on "Start the Walkthrough". Otherwise press the ![]() -button (on the right side), scroll down from the window that slides in and click on "Start the Walkthrough" to begin the walkthrough.
-button (on the right side), scroll down from the window that slides in and click on "Start the Walkthrough" to begin the walkthrough.
| Please play through the walkthrough before introducing OpenSchoolMap to your students. |
|
Possible questions that might arise from your students:
|
Otherwise the tutorial should be self-explanatory.
And here we go!
All changes you made during the "walkthrough" were for practice only and were not entered in OpenStreetMap.
Is something missing on the OpenStreetMap map, or is something even wrong? Perhaps you may notice something at your place of residence or in the area of your school building that can be improved or supplemented.
Since you learned in the walkthrough how to enter and change things in OpenStreetMap, you can now enter what is missing and correct what is wrong!
Your changes will be made, updated and applied to the map within 5-30 minutes!
|
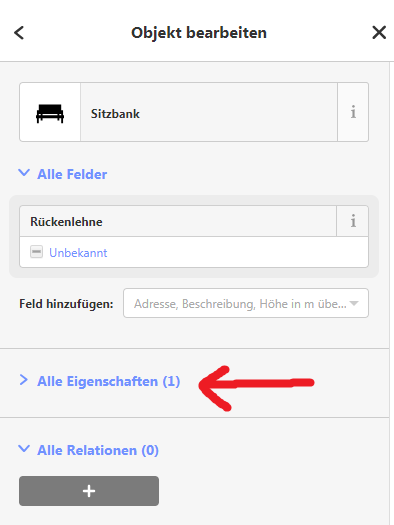
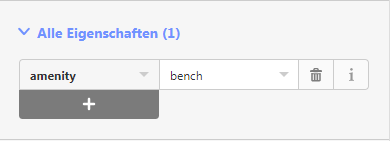
OpenStreetMap saves object properties as tags. You can see this on the left side of the iD editor after selecting an object, as you can see in Figure 1. If you expand the field "All properties", you will see all tags of the object, as in Figure 2. If you don’t know which tag to use, you can check the cheatsheet. |
If you haven’t noticed anything that needs changing or adding, click on the OpenStreetMap logo in the upper left corner to exit the iD Editor and return to the map. Then click on the "Layers"-button ![]() and select the checkbox "Map Notes". If you see notes from other map users indicating errors or omissions, you can fix them by making changes.
and select the checkbox "Map Notes". If you see notes from other map users indicating errors or omissions, you can fix them by making changes.
Another way to find out what you can map is the "OpenStreetMap Tagging Cheatsheet" on OpenSchoolMaps.
|
If you want to stop editing and leave the iD-editor, click on the "OpenStreetMap" logo in the upper left corner. |
If you want to know more about OpenStreetMap, check out OpenSchoolMaps, for example, for more materials.
![]() Freely usable under CC0 1.0
Freely usable under CC0 1.0