A worksheet
I’m sure you’ve heard or read about Geographic Information Systems or GIS somewhere already. Since computers have become more and more powerful and cheaper, more and more people are able to buy a computer, who has enough computing power, to run a GIS program. Therefore, the number of GIS applications has risen. But what exactly do you understand under a Geographic Information System? We will answer this question in the first chapter.
Learning objectives of the theory
After the completion of the first chapter you should have learned the following:
-
Know the components which are needed for a Geographic Information System.
-
List the functionalities of a Geographic Information System without help.
Theory
To help understand what a Geographic Information System is, we have here a definition for it:
|
Definition
A Geographic Information System (GIS) is a computer supported System, which is made out of Hardware, Software and Data and with witch one can model and modify spatial problems in different fields of application. The data/information required for this can be digitally edited, managed, reorganized, analyzed and presented both alphanumerically and graphically. GIS denominates a technology as well as both a product and a means to access and modify geographic information. Ralf Bill, Basics of Geographic Information System, 2016, Wichmann |
![]() Exercise 1
Exercise 1
Study the definition and try to answer the following questions:
data shown in a GIS?_ .Chalkin created the Fourcomponent Model in the year 1977. He described the function of a GIS with 4 components Input, Manipulation, Analysis and Presentation, short IMAP. Exercise: Order each of these components to one of the functions mentioned in the definition.
Components of a Geographic Information System
We know to get deeper into the individual system components Hardware, Software and Data and tell you something more about them.
Hardware
The most important hardware component that belong to a GIS are already mentioned in exercise 1a, a computer with keyboard, display and mouse. Beside peripherals like printer and a means to read in data, (see Chapter "Data Collection and Management") for example a GPS or scanner.
Software
To even run a GIS on your computer you’ll need an operating system. The most common ones are Microsoft Windows, Apple Max OS X, Unix and Linux.
Once an operating system is present you can install the GIS software. The choice is dependent on your operating system, since not every GIS supports each one.
The common GIS products can be divided into two classes. On one hand commercial products like ArcGIS from ESRI or Geomedia from Intergraph and on the other hand open source projects like QGIS, which are free to use.
For products to be allowed to run under open source, they need to comply with the open source license. This license gives user the allowance to freely use, modify and spread of the software. Access to the source code is unrestricted, but the user also has a few obligations. But these mostly concern development and passing around of the product and have of no further implication for our tutorial.
You surely have heard the term free software or freeware. Freeware isn’t the same as open source software. They don’t cost anything but you can’t access the source code.
In this tutorial we’ll use the open source software QGIS, which runs on most operating systems.
We chose QGIS because it lacks licensing cost and is free to install on any computer. You can use it both in school and at home without paying anything.
If there is a problem when using the software, you won’t have the support offered by companies like ESRI or Intergraph. But behind every open source software stands a community. So don’t be afraid to contact them if you’re facing problems or read trough the documentation. You can find out more about this under the following links:
-
Community: https://www.qgis.org/de/site/forusers/support.html
-
Documentation: https://www.qgis.org/de/docs/index.html
Data
As you can see from the definition, the data in a GIS is spatial data. You will learn more about this topic in the next chapter.
Uses
A further component are the applications that are made in a GIS. These range from simple visualizations to complex analyses. You, too, will carry out some applications within this tutorial.
Summary component
![]() Exercise 2
Exercise 2
Repeat for yourself the different components of a GIS and write down a few
words about each of them and not what they are in your case.
QGIS exercise
In the first part of the theory you’ve learned that software is one of four components of the GIS system. In this exercise part you now learn how to use QGIS.
Learning objectives
After this exercise you will be able to:
-
open existing projects in QGIS
-
name and use the different navigation options
Starting QGIS
When you installed the QGIS software, it automatically created a folder with shortcuts for the program on your desktop. You can double click on that shortcut (named QGIS + version number) to start the program. Doing that opens a simple graphical user interface. If this shortcut is missing, you find the program if you use your computers search function. Make sure you open the version that doesn’t have "with Grass" on it.
The graphical user interface
The user interface is separated into seven areas:
-
Menubar
-
Toolbar
-
Spatial bookmarks
-
Browser window
-
Layer window
-
Map window
-
Status bar
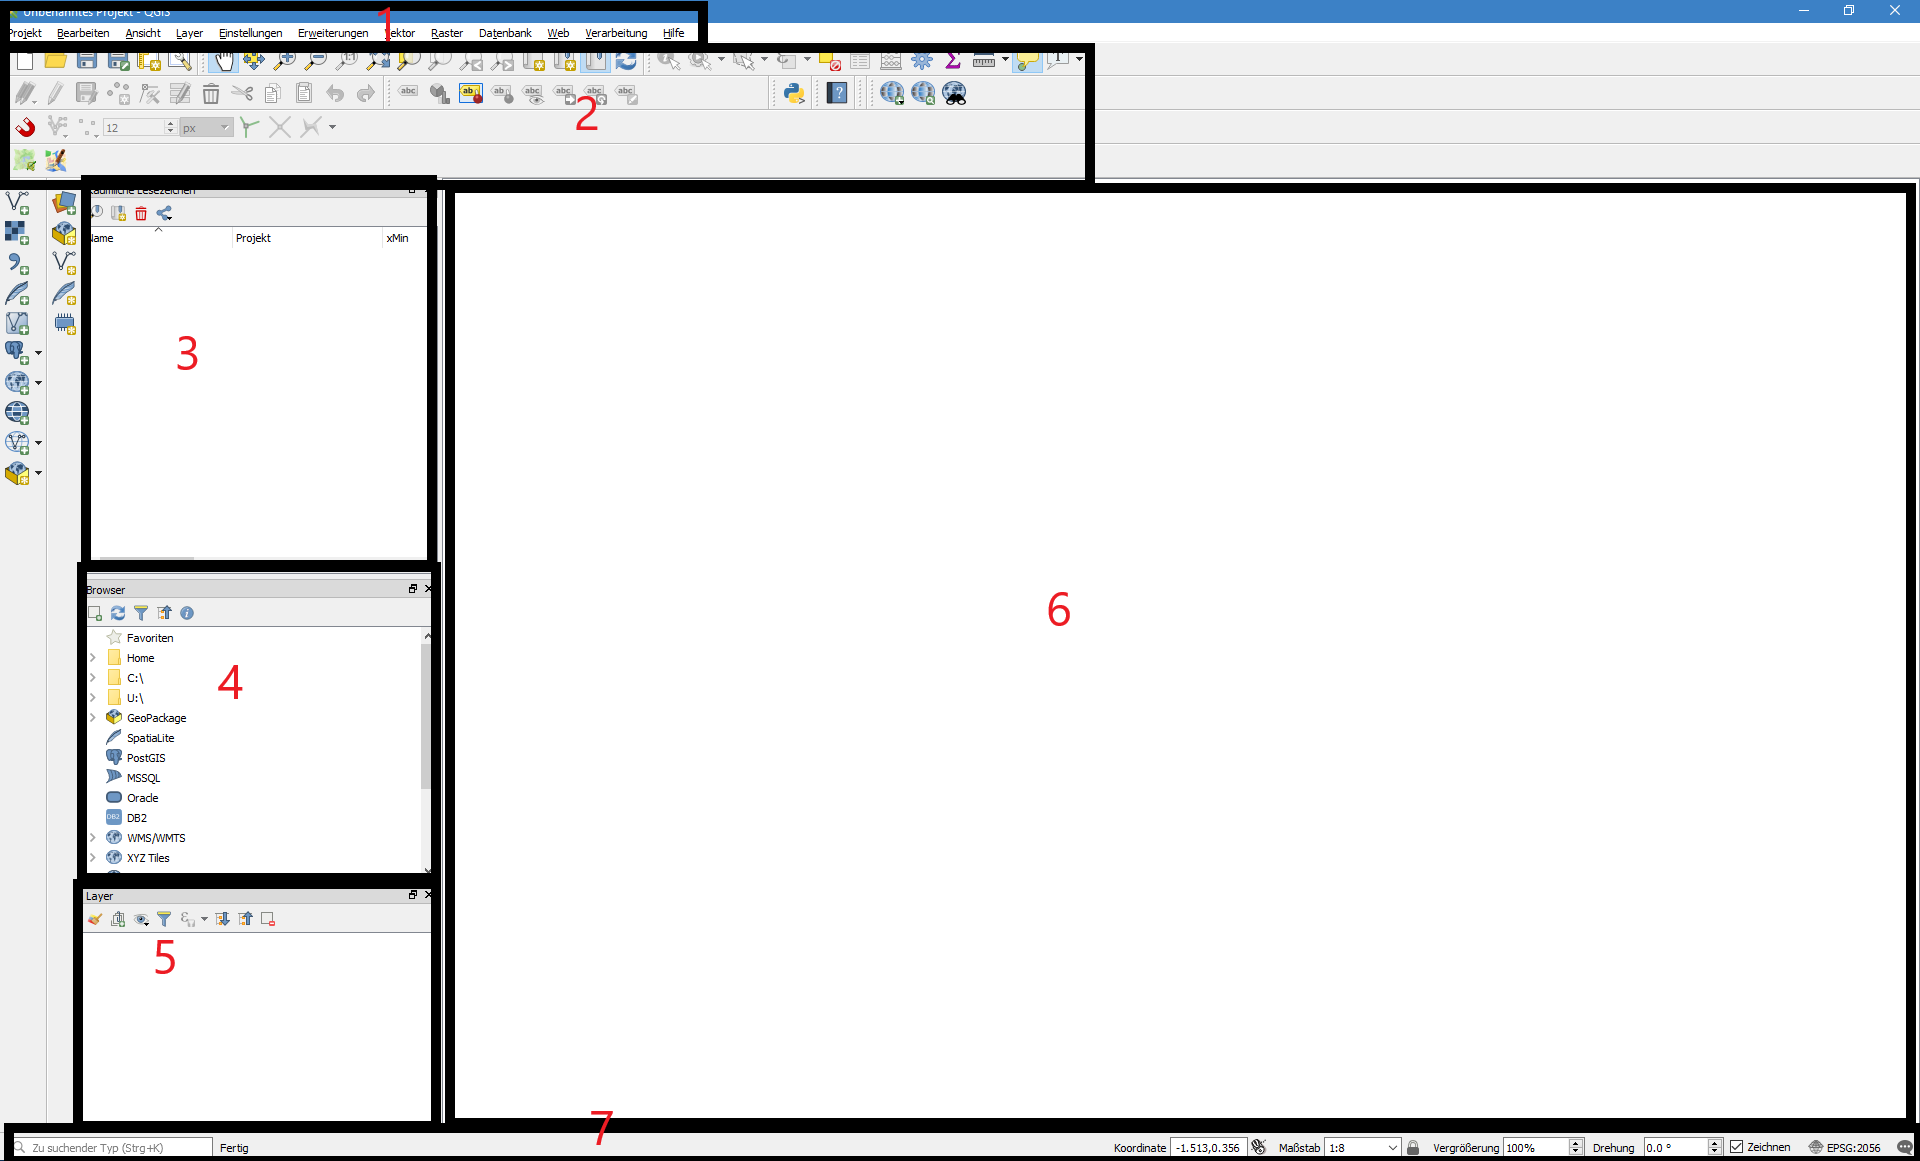
Can you find each area on your own user interface?
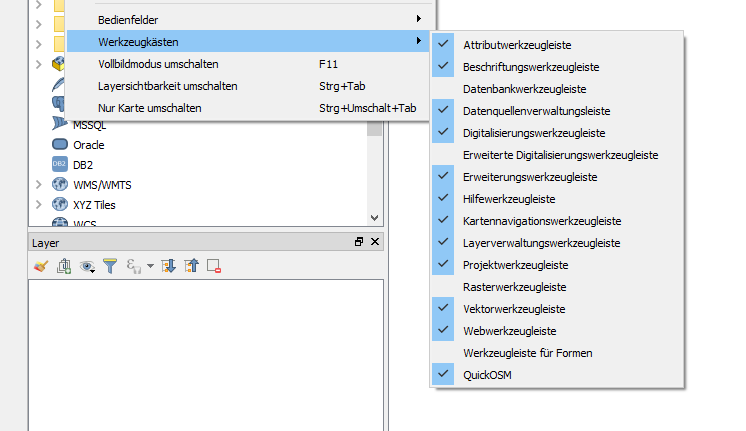
If you can’t see the layer or the browser you can get them via View → Panels and Layers or Browser.
From the menu View → Toolbars you can get the lists of toolboxes. You can add and remove them to your interface by setting the cross in front of its name.
Another option to show and hide the layer window, map overview or toolboxes is using the right mouse button. Simply click with it on the grey dotted boarder and options menu opens up.
Try out these three methods und find out which one you like the most, for use in the future.
Hide the window "Spatial Bookmarks" and show the window "Overview" instead.
Open existing project
In this task we will work with an existing QGIS project. But first we’ll need to load the project into our QGIS. Klick for that on the button Open Project and navigate to where you saved the data for this tutorial. Select the file Teil1.qgs and click on the "Open" button.
In the Layers window you should now be able to see two entries, Lakes and Canton borders. These entries are called layers and are shown graphically in the map window.
Layer window and map window
For a first step we should take a closer look at the interaction between Layer window and Map window.
Die individual layers can be shown and hidden by checking the cross in front of the layer name. Test this function by showing and hiding both layers in the Map window.
| If you can’t see the lake or cantons boarders you can right-click the layer and select Zoom to Layer. |
The order in the map view corresponds on the order in the layer window. So, the lakes entry in the layer window is above the cantons boarders layer, and the same will be true in the map window.
You can change the order of the layers. Simply click on the layer and move it up or down, try it with the lake layer and look what happens.
Return finally the layers back to their original position.
Navigation in the map window
Before you start to navigate on the map, you should set a background for the field Overview. The canton boarders would be perfect for that, just right click the layer and set the check the option Show in Overview. The canton boarders are now visible in the map overview. You can add as many layers as you like. The display order is taken from the order in the layer window.
The tools for navigation in the map window can be found in the toolbox Map Navigation Toolbar.

![]() Exercise 3
Exercise 3
Try out the different tools of the toolbox map navigation and write down in
your own words what each one does, pay attention to what happens in the
overview as well.
| For the navigation in the map window you can use mouse wheel and keyboard as well. Holding spacebar will and the middle mouse button, you can move the map without changing your current tool. |
![]() Exercise 4
Exercise 4
Try the following points and make notes of what happens.
-
Move the mouse wheel forward and backwards while the cursor is on the map.
-
Following keys on the keyboard
-
Arrow keys
-
Page Up/Page Down
-
Hold space down and move your pointer over the map window.
-
Once you’re finished with all the exercises you can save the project under a different name, for example Part1_solved.qgs
Chapter test 1
With the help of the chapter test, you can check if you understood the current information of this worksheet. It serves as an assessment. You should only continue if you understood everything in this chapter.
To do so, write all the answers down. Once you’ve finished them all give it to your teacher to check.
Question 1
Somebody asks you what a GIS is and what it can do.
What do you answer?
Think about the first three question in the theory part and write down bullet points of what they contained.
Question 2
During the exercise you’ve learned some functions to adapt the view in the map window to your requirements. Which tools and options did you get introduced to navigate the Map?
Write down 3 option and explain what they do in a few words.
Question 3
Think about the classes you have (had) in school.
GIS make sense?
Write down which topics would make sense and why. Don’t only think about the
class you’re in right now.
Describe in a few sentences what kind of data the GIS should have and what GIS functions you would use.